Today, no Drupal! For a change, I am going to show you some pure Javascript and a nice hover effect I have recently played with. The effect is visible as a demonstration on my portfolio and is more likely to be interesting to discover using a mouse than your mobile touch screen.
This is called a direction-aware hover effect. In other words, try to imagine various items (my portfolio entries): I want a hover effect which would be different based on the direction my mouse has entered the item - from the top, left, right or bottom. That is exactly what the name stand for right? Direction-Aware Hover Effect!
The code in detail
Let's suppose the following HTML code:
Click to open/close this block
<!doctype html>
<html lang="en">
<head>
    <title>Direction-aware hover effect demo page</title>
    <style>
        .layout {
            width: 1200px;
            margin: 0 auto;
            display: flex;
            justify-content: space-between;
            flex-wrap: wrap;
        }

        .hover {
            background-color: lightblue;
            position: relative;
            display: flex;
            flex: 1 1 30%;
            margin: 1%;
            height: 250px;
            align-items: center;
            justify-items: center;
        }

        .content {
            flex: 1;
            text-align: center;
        }

        .overlay {
            position: absolute;
            height: 100%;
            width: 100%;
            background-color: lightcoral;
            opacity: 0;
        }
    </style>
    <script>
        /* Script will go here */
    </script>
    <style>
        /* CSS will go here */
    </style>
</head>
<body>

<div class="layout">
    <div class="hover">
        <div class="content">Item 1</div>
        <div class="overlay"></div>
    </div>
    <div class="hover">
        <div class="content">Item 2</div>
        <div class="overlay"></div>
    </div>
    <div class="hover">
        <div class="content">Item 3</div>
        <div class="overlay"></div>
    </div>
    <div class="hover">
        <div class="content">Item 4</div>
        <div class="overlay">Info 4</div>
    </div>
    <div class="hover">
        <div class="content">Item 5</div>
        <div class="overlay"></div>
    </div>
    <div class="hover">
        <div class="content">Item 6</div>
        <div class="overlay"></div>
    </div>
</div>

</body>
</html>
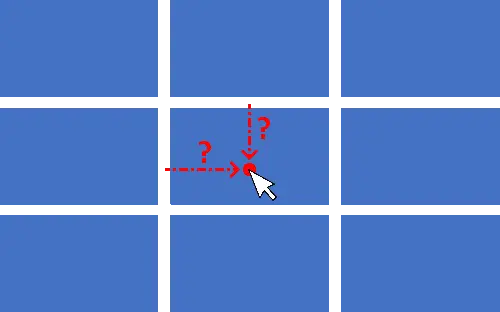
This HTML page, purposely basic, introduces a grid of six elements as shown in the previous figure.
An "overlay" covers each tile with a red veil over the blue item: nothing really appealing so far.
Let's add the following Javascript code:
document.addEventListener('DOMContentLoaded', function (event) {

  // Loop over items (in a IE11 compatible way).
  var items = document.getElementsByClassName('hover');
  for (var i = 0; i < items.length; i++) {

    // Loop over the registered event types.
    ['mouseenter', 'mouseleave'].forEach(function (eventname) {

      // Add an eventListener of the given type for the current item element.
      items[i].addEventListener(eventname, function (event) {

        // Retrieve the direction of the enter/leave event.
        var dir = getHoverDirection(event);

        // Reset classes.
        // > If support for IE11 is not needed.
        // event.currentTarget.classList.remove('mouseenter', 'mouseleave', 'top', 'right', 'bottom', 'left');
        // > If support for IE11 is needed.
        event.currentTarget.classList.remove('mouseenter');
        event.currentTarget.classList.remove('mouseleave');
        event.currentTarget.classList.remove('top');
        event.currentTarget.classList.remove('right');
        event.currentTarget.classList.remove('bottom');
        event.currentTarget.classList.remove('left');

        // Add the event and direction classes.
        // > If support for IE11 is not needed.
        // event.currentTarget.classList.add(event.type, dir);
        // > If support for IE11 is needed.
        event.currentTarget.className += ' ' + event.type + ' ' + dir;

      }, false);
    });
  }
});
This code seems quite verbose because of the old style E11 compatibility syntax/ However, it is extremely simple nonetheless:
- We find and loop through all items having the hover class
- For each of those items, two listeners are added to react to the following events:
- The user enters his mouse on the item (or touches the item using a touch screen)
- The user exists hi mouse from the item (or touches the screen outside the item)
- For each of both cases, the following is done:
- All possible classes remaining from a previous events are removed from the item
- A class with the event name (mouseenter or mouseleave) is added
- A class with the entry direction (top, right, bottom or left) is also added
The whole magic happens in the method called getHoverDirection. That one takes the event as a parameter and returns the side by which the mouse enters the item - as an output string with four possible values (top, right, bottom or left).
Here is the code for that method:
/*
* Get the direction by which an element has been hovered.
*
* It is done by determining in which quadrant is the mouse
* inside the element when mouseenter/mouseleave event starts.
* This is done using trigonometry on the pointer position
* relative to the center of the element.
* @see https://freelance-drupal.com/node/79 for details
*
* @param event
*   The event triggering the computation.
*
* @result string
*   Can be 'top', 'right', 'bottom', 'left' depending on the situation.
*/
const getHoverDirection = function (event) {
  var directions = ['top', 'right', 'bottom', 'left'];
  var item = event.currentTarget;

  // Width and height of current item.
  var w = item.offsetWidth;
  var h = item.offsetHeight;

  // Calculate the x/y value of the pointer entering/exiting, relative to the center of the item.
  // Scale (sort of normalize) the coordinate on smallest side to the scale of the longest.
  var x = (event.clientX - item.getBoundingClientRect().left - (w / 2)) * (w > h ? (h / w) : 1);
  var y = (event.clientY - item.getBoundingClientRect().top - (h / 2)) * (h > w ? (w / h) : 1);

  // Calculate the angle to the center the pointer entered/exited
  // and convert to clockwise format (top/right/bottom/left = 0/1/2/3).
  var d = Math.round(Math.atan2(y, x) / 1.57079633 + 5) % 4;

  return directions[d];
};
I think most developers will easily read and copy that code - and it is enough more most. However, those who desire to understand it more deeply are invited to read the paragraph below called "mathematics explained". The math level is fairly easy don't worry as it only requires basic trigonometry knowledge.
CSS Animations
Currently, we now have the Javascript methods to enrich our items hover duo of classes depending of the user interaction with them:
- mouseenter or mouseleave depending on whether the element has just been hovered or leaved
- top, right, bottom or left to indicate the side by which the event just triggered
And this is it! With only those two classes we have everything we need to now play with pure CSS3 effects to create interesting animations.
Here is the CSS code basics:
/* Hide overflowing HTML elements */
.hover {
  overflow: hidden;
}
/*Animate overlay and move it 'above'*/
.hover .overlay {
  transform: translate3d(-100%, 0, 0);
  animation-duration: 0.5s;
  animation-fill-mode: forwards;
  animation-timing-function: cubic-bezier(0.25, 0.46, 0.45, 0.94);
}


/* Mouse enter event */
.hover.mouseenter.top .overlay {
  animation-name: animation--enter-top;
}
.hover.mouseenter.right .overlay {
  animation-name: animation--enter-right;
}
.hover.mouseenter.bottom .overlay {
  animation-name: animation--enter-bottom;
}
.hover.mouseenter.left .overlay {
  animation-name: animation--enter-left;
}

/* Mouse leave event */
.hover.mouseleave.top .overlay {
  animation-name: animation--leave-top;
}
.hover.mouseleave.right .overlay {
  animation-name: animation--leave-right;
}
.hover.mouseleave.bottom .overlay {
  animation-name: animation--leave-bottom;
}
.hover.mouseleave.left .overlay {
  animation-name: animation--leave-left;
}
In details:
- All elements outside the hovered item are hidden using the overflow property with the hidden value.
- The overlay item is shifted 100% of its height on the top direction. It is therefore now fully above the hover item itself and therefore fully in "overflow" hence invisible. From now, the base position is the blue item fully visible with the red veil invisible above the item.
- We add some configurations for the item animations. Any animation would now take 0.4s. Once done, the overlay will keep its end position - meaning the animation does not reset to first position nor loops. Finally, the timing will follow a Bezier curve that will be not linear in time. For example, a translation would first accelerate fast then slow down as the end position is in reach. Small detail, changes everything!
- Last but not least, for any interaction type we define a different animation that now need to be coded.
Sliding
First possible interaction is the one I chose in my own portfolio: a simple sliding of the overlay.
/* Sliding animations ! */
@keyframes animation--enter-top {
  0% { transform: translate3d(0, -100%, 0); }
  100% { transform: none; }
}
@keyframes animation--enter-right {
  0% { transform: translate3d(100%, 0, 0); }
  100% { transform: none; }
}
@keyframes animation--enter-bottom {
  0% { transform: translate3d(0, 100%, 0); }
  100% { transform: none; }
}
@keyframes animation--enter-left {
  0% { transform: translate3d(-100%, 0, 0); }
  100% { transform: none; }
}
@keyframes animation--leave-top {
  0% { transform: none; }
  100% { transform: translate3d(0, -100%, 0); }
}
@keyframes animation--leave-right {
  0% { transform: none; }
  100% { transform: translate3d(100%, 0, 0); }
}
@keyframes animation--leave-bottom {
  0% { transform: none; }
  100% { transform: translate3d(0, 100%, 0); }
}
@keyframes animation--leave-left {
  0% { transform: none; }
  100% { transform: translate3d(-100%, 0, 0); }
}
Slide-and-push!
Everything is now a matter of CSS customization. Here is another possible interaction, the slide-and-push when the overlay will kind of push the blue item outside as it slides.
Flipping
Let's continue with demonstration of flipping the overlay as if it is a box cover we open or close.
Your turn next!
Time for you to play - rotate the overlay with the blue item on the other side, zoom the overlay, fade the overlay - anything is possible!
Mathematical explanations
To this point in the article, most developers have left, either they understood the code, copied it or modified it as needed. However, I would like the chance to give you a mathematical explanation on how the direction-aware detection works. Don't be scared, we can pretend being smart with math but truth is the following will be basic trigonometry level!
As we hover an item (or touch it), an event is triggered in Javascript. This event is given to the getHoverDirection method. This method is the one explained below.
First, we will extract data from the item event. This item has a position and size: get the height and width of it is trivial. As of the position, please note two things:
- The item position is given by the top-left corner - in orange in the figure. I chose to get the position in pixel relatively to the screen - that means the position (0, 0) is on the top left of your screen. The y axis is therefore inverted compared to what we are used to when showing axes. The higher is y, the lower on screen is the point.
- The mouse position (or finger) at the time of event is in red on the figure. Contrarily to what usually done, we don't get the eventX, eventY relatively to the page but we use here clientX, clientY which are related to the screen. Our two positions therefore are now in the same spatial frame of reference and can be compared.
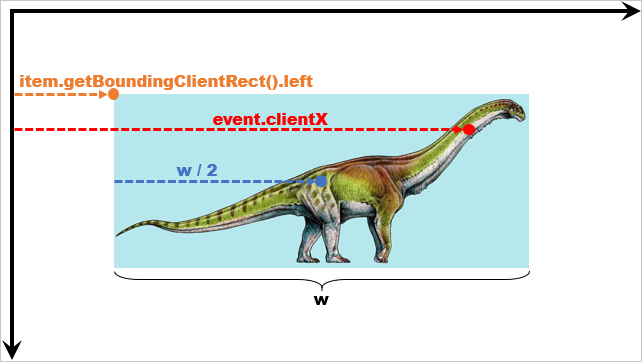
var x = (event.clientX - item.getBoundingClientRect().left - (w / 2))
Using the noticeable points highlighted in the previous figure, we can now compute the position of the mouse relatively to the item center.
This is a shift in frame of reference that we calculate using a translation of the reference frame center. The axis direction won't change. In particular, the ordinate axis y will stay inverted. As of now, a negative y value means that the mouse is located in the top half of the item while a positive y value indicates a mouse position within the lower half.

x = x * (w > h ? (h / w) : 1);
In the following, we will need to have our item inside a trigonometric circle. To do so, we need to scale the coordinate system - to normalize it - so that the mouse position will be in a system where the unit is the longest dimension between height and width. That is done by multiplying the shortest side position by the inverse ratio of the dimensions.
This sentence seems complex right? Well, is just means to perform a basic « rule of three », on the height or the width depending on which is the biggest.
Visually, that means our mouse position coordinates are now measured in an item scaled to be square (hence fitting in a circle).
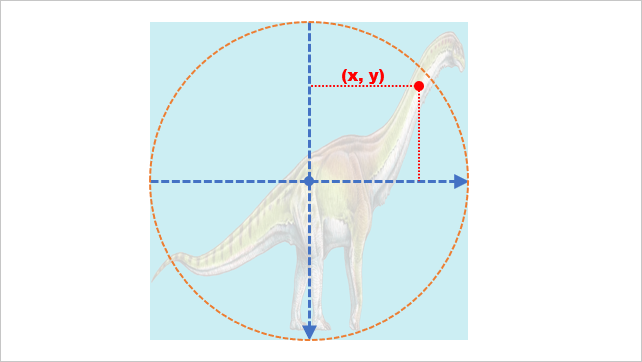
var theta = Math.atan2(y, x);
SOH CAH TOA!
Can you remember this mnemonic? The TOA part means Tangent of the angle = Opposite side over Adjacent, and therefore the theta angle given in radian is the arctangent of the opposite side length divided by the adjacent side length to that angle.
Notice how we now use radian value? Using radian let us now the four noticeable angle values that will be very interesting in the following.

theta = thetha / 1.57079633);
We now decide to divide the angle by PI/2 which is half-pi or 1.57079633...
The effect of this is to reduce the value of the angle. From there, we can deduce the quarter in which the mouse is due to our trigonometric construction. For example:
- If the mouse is - as in the figure aside - in the top right quarter, therefore the divided angle value is somewhere between 0 and -1.
- If the mouse is in the top left quarter, the value is between -1 and -2.
- If the mouse is in the bottom right quarter, our angle is between 0 and 1 radian.
- Finally, if the mouse is in the bottom left quarter, the angle will be between 1 and 2 radians.

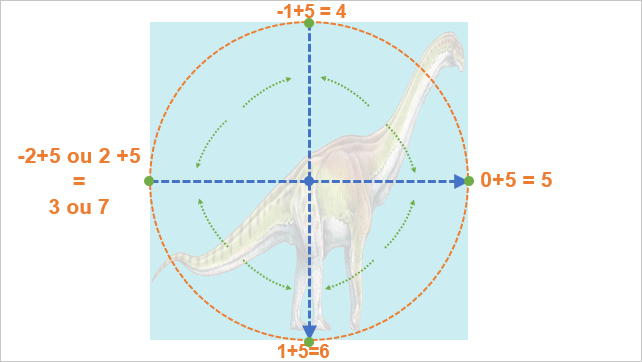
theta = theta + 5;
theta = Math.round(theta);
Now two operations on our angle. Firstly, let's add 5 in order to always have positive maxima, between 1 and 5 depending on the cases (cf orange calculation on the figure). This is similar to previous operation described above.
Secondly, we are rounding the angle value to the nearest integer. Visually on the figure, that operation is represented by the green arrows: it is about finding the vertical or horizontal line which is the closest to the mouse point. Is our mouse closest to the vertical or the horizontal?
After that operation, we have an angle that can be exactly one of the four possible midpoints of the item (top, left, right or bottom).
Since each of that point has a different value, we won!
var d = theta % 4;
Last step, we now perform a modulo on the value. This modulo operation means seeking the rest of the Euclidian division. In other words, 7%4 (read 7 modulo 4) is 3 because 7 divided by 4 is 1 with a leftover of 3.
We now have four possible values only: 0, 1, 2 or 3. Those values can now be used as index in and array where the correct classes to apply to the item are set.

var directions = ['top', 'right', 'bottom', 'left'];
return directions[d];
Trick is done! By using the value as array index, we can now get the correct direction using the following rules:
- If we have 0, the mouse enters from top
- The value 1 stand for arrival by the right side
- 2 for the bottom
- and 3 if coming from above
Add new comment